 Download PDF
Part 4 - Dialogs and User Interaction
14. Standard and Custom Dialogs
Part 4 introduces Prima’s dialog system: message boxes, file dialogs, the Find/Replace dialog, and other built-in tools. You also learn the difference between modal and modeless dialogs, and how to build a simple custom dialog for your own input tasks.
14.1 Message Boxes (Info, Warning, Confirm)
Use
use Prima qw(Application MsgBox);

message_box( "Information", "Operation completed.",
             mb::Ok, compact => 1);

my $answer = message_box(
                 "Exit?", "Close application?",
                 mb::OKCancel | mb::Question, compact => 1 );

exit if( $answer == mb::OK );

Prima->run;
Listing 14.1: Messagebox
Common flags:
- Buttons:
mb::Ok ,mb::OKCancel ,mb::YesNo - Icons:
mb::Information ,mb::Error ,mb::Warning ,mb::Question - Option:
compact => 1 reduces the dialog width when possible, removing unused space.
14.2 Open/Save Dialogs
Prima provides flexible open/save dialogs:

Figure 14.1: File Open dialog
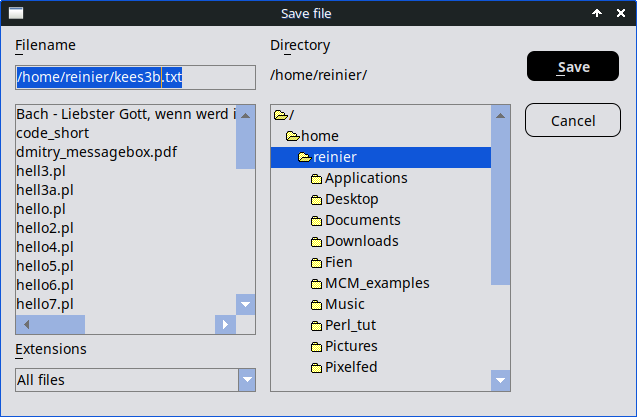
Figure 14.2: File Save dialog
use Prima qw(Application Dialog::FileDialog); #------------------------------------------------------------ my $open = Prima::Dialog::OpenDialog->new( filter => [ [ "Text files" => "*.txt" ], [ "All files" => "*" ], ], ); unless ( $open->execute ) { message_box( "Exit", "No file selected!", mb::OK | mb::Warning, compact => 1 ); $::application->close; } open( my $fh, '<', $open->fileName ) or do { message_box( "Error", "Cannot open '".$open->fileName."': $!", mb::OK | mb::Error, compact => 1 ); $::application->close; };# Open file dialog #------------------------------------------------------------ # local $/ = undef; means slurp mode, i.e. reading an entire # file into a single string all at once, here: $content my $content = do { local $/; <$fh> }; close $fh;#------------------------------------------------------------ # Save file dialog #------------------------------------------------------------ my $save = Prima::Dialog::SaveDialog->new( fileName => $open->fileName, ); unless ( $save->execute ) { message_box( "Exit", "Save cancelled!", mb::OK | mb::Warning, compact => 1 ); $::application->close; } open( my $out, '>', $save->fileName ) or do { message_box( "Error", "Cannot write to '".$save->fileName."': $!", mb::OK | mb::Error, compact => 1 ); $::application->close; }; close $out; message_box( "Done", "File saved successfully.", mb::OK, compact => 1 ); $::application->close; Prima->run;
Listing 14.2: File Open dialog and File Save Dialog
Key options:
directory - initial directoryfilter - filter setstext - window title
14.3 Find and Replace Dialogs
Perl Prima includes a built-in Search and Replace dialog. While we’ll explore this in Part 9, you don’t have to wait to see it in action! Simply run
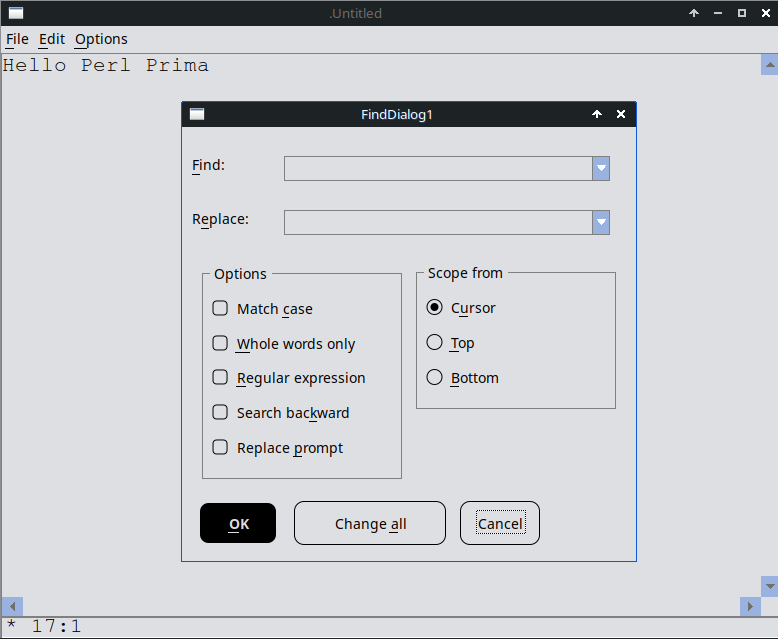
Figure 14.3: Find and Replace dialog
14.4 More Dialogs in Prima
Prima provides several built-in dialogs that simplify common user interactions. These dialogs offer a familiar, consistent interface across applications and can be integrated with only a few lines of code.
| Module | Description | Example |
|---|---|---|
| FontDialog | Standard font selection dialog | Prima::Dialog::FontDialog |
| ImageDialog | Image file open dialog | Prima::Dialog::ImageDialog |
| ImageSaveDialog | Image save dialog | Prima::Dialog::ImageDialog |
| ColorDialog | Standard color selection | Prima::Dialog::ColorDialog |
| PrintDialog | Standard printer setup dialog | Prima::Dialog::PrintDialog |
Table 14.1: Dialogs in Prima
14.5 Modal vs. Modeless Dialogs
A modal dialog blocks the rest of the application until the dialog is closed. Nothing else can be clicked or interacted with.
my $dlg = Prima::Dialog->new(
    text => "Modal Example",
);
$dlg->execute; # 'execute' opens the dialog modally (blocks until closed).
A modeless dialog does not block:
my $dlg = Prima::Dialog->new(
    text => "Modeless Window",
);
$dlg->show; # show displays the dialog modelessly
            # (the application continues running).
Use modal dialogs for confirmations, warnings, and file open/save operations. Use modeless dialogs for tools, inspectors, and utility windows.
14.6 Constructing Your Own Dialog
A custom dialog in Prima is simply a small modal window built from standard widgets and tailored to a specific task. Unlike general-purpose dialogs such as file pickers or message boxes, a custom dialog lets you design your own layout and collect exactly the information you need. By subclassing
This example shows how to build a simple custom dialog and how to use it in the main program.
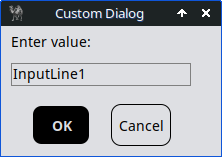
Figure 14.4: Custom Dialog
a. Beginner-First Version: Simple Custom Dialog
Start with the basics: a tiny dialog that just asks for a name and shows it back. This introduces the idea without overwhelming details like inheritance or key handling. Once you get this working, you can copy-paste it into your main program and see a window pop up.
use Prima qw(Application Buttons InputLine Label); # A custom dialog my $dlg = Prima::Dialog ->new( text => 'Custom Dialog', size => [200, 130], icon => Prima::Icon->load('icon.png'), );# Label: tells the user what to do $dlg->insert( Label => text => "Enter value:", origin => [10, 100], size => [280, 20], ); $dlg->{input} = $dlg->insert( InputLine => origin => [10, 70], width => 180, );# OK Button # modalResult tells the dialog 'I was closed by OK'. $dlg->insert( Button => text => "OK", default => 1, origin => [30, 10], width => 60, modalResult => mb::OK, );# Cancel Button # modalResult signals 'Cancel was pressed'. $dlg->insert( Button => text => "Cancel", origin => [110, 10], width => 60, modalResult => mb::Cancel, );# Show the dialog and wait until the user clicks something. my $res = $dlg->execute;# After the dialog closes, check HOW it was closed: if( $res == mb::OK ) {# OK -> read the text field we stored in $dlg->{input}->text print "You entered: " . $dlg->{input}->text ."\n"; } else { print "Cancelled.\n"; } $::application->close; Prima->run;
Listing 14.3: Custom Dialog
No fancy subclassing yet; we're just using Prima's built-in
b. Advanced-Later Version: Full Custom Dialog with Subclassing
Now that the simple version works, upgrade it to a reusable "class" (like a blueprint you can create multiple times). This adds inheritance (
The code has two parts:
1. The Dialog (MyDialog )
Here we design the dialog: a label, an input field, and OK/Cancel buttons. For now, just see
2. The Main Program
This part creates the dialog, shows it, and checks whether the user pressed OK or Cancel. If OK was clicked, we read the text from the input field.
use Prima qw(Application Buttons InputLine Label Const MsgBox); # ------------------------------------------------------------- # Custom Dialog Class (Don't worry — you can treat it like a box # we can 'design' once and then create later.) # ------------------------------------------------------------- {# This tells Perl: 'MyDialog behaves like a Prima Dialog.' # (You don’t have to understand inheritance yet.) package MyDialog; use base qw(Prima::Dialog); # inherit from Prima::Dialog sub init{# Perl gives our method the object in $self or put simply: # $self is the dialog you are building. # Everything else (like text => 'Custom Dialog') goes # into %profile. We don’t have to worry about the details # yet — this is just Prima’s standard pattern. my ( $self, %profile ) = @_;# Always call the parent's init - standard Prima practice. $self->SUPER::init(%profile);# Label # A simple text line inside the dialog. $self->insert( Label => text => "Enter value:", origin => [10, 100], width => 150, );# A text field where the user can type. # # We also store a reference in $self->{input} so that # the main program can later read what the user typed, # publicly accessible as $dlg->{input} $self->{input} = $self->insert( InputLine => origin => [10, 70], width => 180, );# OK Button # modalResult tells the dialog 'I was closed by OK'. $self->insert( Button => text => "OK", default => 1, origin => [30, 10], width => 60, modalResult => mb::OK, );# Cancel Button # Same idea: this signals 'Cancel was pressed'. $self->insert( Button => text => "Cancel", origin => [110, 10], width => 60, modalResult => mb::Cancel, );# ESC key closes dialog # This is just a convenience: press ESC -> same as cancel. $self->onKeyDown( sub{ my ($dlg, $code) = @_;# kb::Esc is provided by Prima::Const (imported via # Prima qw(... Const ...)) $dlg->cancel if $code == kb::Esc; }); return $self; } }# ------------------------------------------------------------- # Main Application # ------------------------------------------------------------- # Create the dialog. # (Prima will automatically call our init() above.) my $dlg = MyDialog->new( text => "Custom Dialog", width => 220, height => 130, icon => Prima::Icon->load('icon.png'), );# Show the dialog and wait until the user clicks something. my $res = $dlg->execute;# After the dialog closes, check HOW it was closed: if( $res == mb::OK ) {# OK -> read the text field we stored in $dlg->{input} my $value = $dlg->{input}->text; print "You entered: $value\n"; } else { print "Cancelled.\n"; } $::application->close; Prima->run;
Listing 14.4: Custom Dialog
Closing Words
In Part 4, you’ve explored Prima’s powerful dialog system, from standard message boxes and file dialogs to custom input forms. These tools are not just theoretical - they are essential building blocks for real-world applications, including the editor you’ll create in later chapters.
- Standard Dialogs: You can now work with message boxes, File/Save dialogs, FontDialog, ImageDialog, ImageSaveDialog, ColorDialog, and PrintDialog. (The Find/Replace dialog will be covered later.)
- Modal vs. Modeless: You know when to block user interaction (modal) for focused tasks and when to allow multitasking (modeless), ensuring smooth and intuitive workflows in your applications.
- Custom Dialogs: You’ve learned to build your own dialogs - from simple input forms to reusable, subclassed components -giving you the flexibility to create specialized interfaces like settings panels or about dialogs for your application.
Looking Ahead
In Part 9, you’ll dive deeper into these concepts and develop a fully functional editor that integrates everything you’ve learned. Until then, take the time to experiment with the dialogs and try creating your own custom dialog. The more familiar you become with these features, the more confident and prepared you’ll be when building your complete application.
Up Next: My Personal Message Utility!
Extra: a personal utility
1. Why wordWrap Is the Best Solution for a Message Box That Fits the Text
When showing messages of different lengths, the goal is simple: the dialog should always fit the text nicely - not too wide, not too cramped. It might seem easy to size the box by counting how many characters the text has, but that doesn’t work well because fonts aren’t uniform. Some letters, like W, take up more space than i, and different fonts or sizes change how much room the same text needs.
The
This approach uses Prima’s own layout system — the same one it uses to draw text — so the result is always accurate, clean, and consistent. In short,
The built-in message_box with its compact property already does a great job for most cases, but it doesn’t cover everything I need. That’s why I created my own message box subroutine - one that’s highly customizable… and yes, with
2. Creating, invoking and modifying My Custom Message Window
The showMessageDialog subroutine, which accepts five arguments, is my solution. I use it for displaying messages (info, warning, error) and as a monitoring tool during debugging.
First step
Define a subroutinesub showMessageDialog { # this subroutine is called with 5 arguments, which are passed to a list. my ($width, $height, $title, $message, $textalign) = @_;# ensuring default values $width = $width && $width > 0 ? $width : 300; $height = $height && $height > 0 ? $height : 140; $title ||= 'Message'; $message ||= ''; $textalign ||= ta::Center;# other options: ta::Left, ta::Right my $icon = eval { Prima::Icon->load('icon.png') };# warn "Failed to load icon: $@" if $@; my $dlg = Prima::Dialog->new( size => [$width, $height], text => $title, centered => 1, icon => $icon, ); $dlg->insert( Label => pack => { fill => 'x', side => 'top', pad => 12 }, alignment => $textalign, autoHeight => 1,# wordWrap => 1: no manual textWidth calculation is needed wordWrap => 1, text => $message, color => cl::Blue, ); $dlg->insert( Button => pack => { fill => 'none', side => 'bottom', pad => 15 }, size => [50, 30], text => 'Ok', default => 1, onClick => sub { $dlg->destroy; }, );# make Escape close the dialog $dlg->onKeyDown(sub { my ($self, $code, $key, $mod) = @_; if ($key == kb::Escape) { $dlg->destroy; } });# execute brings the widget in a modal state $dlg->execute(); }# return a true value to the interpreter 1;
Second step
Invoke showMessageDialog.pl in your program.
use Prima qw(Application Buttons Label); use lib '.'; require 'showMessageDialog.pl'; my $icon = eval { Prima::Icon->load('icon.png') }; # warn "Failed to load icon: $@" if $@; my $mw = Prima::MainWindow->new( text => 'Demo messagewindow', size => [360, 220], centered => 1, icon => $icon, ); $mw->insert( Button => pack => { side => 'top', pad => 150 }, size => [120, 40], text => 'Message', onClick => sub { my $text = "This is a demo text";# you can easily change the width (here: 320) and height # (here: 140) if the text is large. showMessageDialog( 320, 140, "Demo", $text, ta::Left ); }, ); Prima->run;
Third step
- You can easily adjust the width and height for larger text.
- Use
\n to insert a line break. - Add a color parameter for text or background color
- Add
use Prima::Drawable::Markup q(M); for colored text. Example:
  $text = "This is a C<Red|demo> text ";
  showMessageDialog( 320, 140, "Demo", M $text, ta::Left );