1. Why Prima?
2. Some backgrounds
3. MainWindow
4. Pushbutton
5. Label
6. Pack
7. Messagewindow
8. Inputline
9. Radiobutton
10. Combobox
11. Checkbox
12. Listbox
13. Frames
14. Menu
15. Inputline: undo
16. Mini Text 1
17. Mini Text 2
18. Stopwatch
19. Memory test
20. Links
...under construction...
6. Geometry manager: pack
To position widgets in the MainWindow, you can use the
Example 1
use Prima qw(Application Themes Buttons); $mw = Prima::MainWindow-> create( text => "Pack ex. 1", sizeMin => [250, 200], sizeMax => [250, 200], skin => 'flat', ); $mw-> insert( Button => pack => { fill => 'none', side => 'top', pad => 10 }, # side => 'top' can be omitted: 'top' is the default value text => "none - top - 10", onClick => sub { $::application-> close }, ); run Prima;
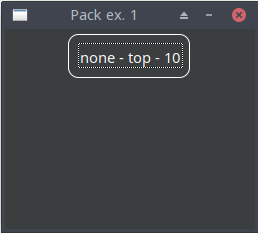
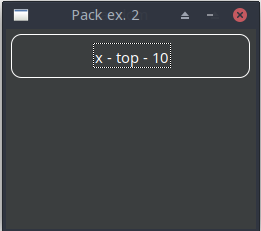
Example 2
use Prima qw(Application Themes Buttons); $mw = Prima::MainWindow-> create( text => "Pack ex. 2", sizeMin => [250, 200], sizeMax => [250, 200], skin => 'flat', ); $mw-> insert( Button => pack => { fill => 'x', side => 'top', pad => 10 }, # fill => 'x' increases the button size horizontally text => "x - top - 10", onClick => sub { $::application-> close }, ); run Prima;
Example 3
use Prima qw(Application Themes Buttons);

my $mw = Prima::MainWindow-> create(
	text    => "Pack ex. 3",
	sizeMin => [250, 200],
	sizeMax => [250, 200],
);

$mw-> insert(
    Button =>
           pack => { fill => 'none', side => 'top', pad => 10 },
           text => "none - top - 10",
           onClick => sub { $::application-> close },
);

$mw-> insert(
    Button =>
           pack => { fill => 'none', side => 'bottom', pad => 10 },
           text => "none - bottom - 10",
           onClick => sub { $::application-> close },
);

run Prima;
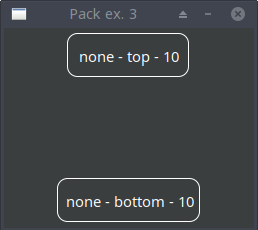
Example 4
use Prima qw(Application Themes Buttons); my $mw = Prima::MainWindow-> create( text => "Pack ex. 4", sizeMin => [250, 200], sizeMax => [250, 200], skin => 'flat', ); $mw-> insert( Button => pack => { fill => 'none', side => 'top', pad => 20 }, # horizontal and vertical external padding 20 text => "none - top - 20", onClick => sub { $::application-> close }, ); $mw-> insert( Button => pack => { fill => 'none', side => 'top', pad => 20 }, text => "none - top - 20", onClick => sub { $::application-> close }, ); $mw-> insert( Button => pack => { fill => 'none', side => 'top', pad => 20 }, text => "none - top - 20", onClick => sub { $::application-> close }, ); run Prima;
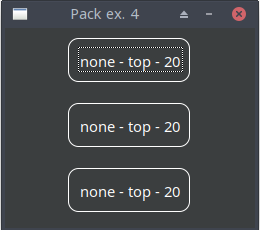
Example 5
use Prima qw(Application Themes Buttons Label); my $mw = Prima::MainWindow-> create( text => "Pack ex. 5", sizeMin => [425, 200], sizeMax => [425, 200], skin => 'flat', ); $output = $mw-> insert( Label => pack => { fill => 'none', side => 'top', pad => 20 }, text => "Buttons on a row", autoHeight => 1, font => { size => 18, }, ); $mw-> insert( Button => pack => { fill => 'x', side => 'left', pad => 20 }, # horizontal and vertical external padding 20 text => "x - left - 20", onClick => sub { $::application-> close }, ); $mw-> insert( Button => pack => { fill => 'x', side => 'left', pad => 20 }, text => "x - left - 20", onClick => sub { $::application-> close }, ); $mw-> insert( Button => pack => { fill => 'x', side => 'left', pad => 20 }, text => "x - left - 20", onClick => sub { $::application-> close }, ); run Prima;
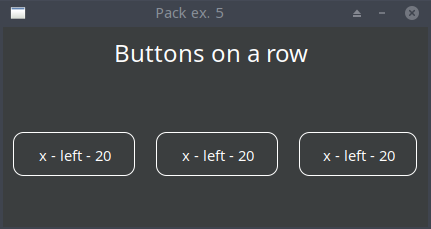
For now, this will do. If you like to experiment with other options, read the documentation: https://metacpan.org/dist/Prima/view/pod/Prima/Widget/pack.pod
6.1 How do I know my neighbour button?
I recommend to use always the object's name property in order to set properties of an object. So for the pushbuttons e.g.:To set the background color of PB_2 to the white color, you could write:$mw-> insert( Button => pack => { fill => 'x', side => 'left', pad => 20 }, # horizontal and vertical external padding 20 name => "PB_1", text => "x - left - 20", onClick => sub { $::application-> close }, ); $mw-> insert( Button => pack => { fill => 'x', side => 'left', pad => 20 }, name => "PB_2", text => "x - left - 20", onClick => sub { $::application-> close }, ); $mw-> insert( Button => pack => { fill => 'x', side => 'left', pad => 20 }, name => "PB_3", text => "x - left - 20", onClick => sub { $::application-> close }, );
Alternatively, you can omit the name property and define an object like this:$mw-> PB_2-> backColor(0xFFFFFF);
To set the background color of this button to the white color, you could write:$PB_2 = $mw-> insert( Button => pack => { fill => 'x', side => 'left', pad => 20 }, text => "x - left - 20", onClick => sub { $::application-> close }, );
$PB_2-> backColor(0xFFFFFF);
6.2 Pushbutton again
The code of the previous section 4. Pushbutton can now be written as:use Prima qw(Application Themes Buttons Label); $mw = Prima::MainWindow-> create( text => "Random", sizeMin => [250, 200], sizeMax => [250, 200], ); $mw-> borderIcons(bi::SystemMenu); # system menu button and/or close button ( usually with icon ) is shown $output = $mw-> insert( Label => pack => { fill => 'none', side => 'top', pad => 50 }, size => [50, 50], text => "", font => { size => 26, }, ); $mw-> insert( Button => pack => { fill => 'none', side => 'top', pad => 50 }, size => [150, 50],# explicit definition of size; otherwise Prima would determine text => "Random number!", default => 1, onClick => sub { $random_number = int(rand(100)); $output-> set(text => $random_number); }, ); run Prima;
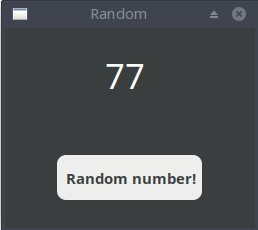
It's easy now to make a 'Guess My Number' game. But then we've to implement another widget: the Inputline. I'll discuss this in 8. Inputline